Apps & Services May Have Access to Your Apple Music & Media Library — Here’s How to Check & Revoke Their Permissions « iOS & iPhone :: Gadget Hacks

Third-party apps in your iPhone should ask in your permission to entry your library within the Music app. Some will even wish to get entry to your Apple Music account. If you happen to now not use the apps, you should not be letting them have entry anymore. It is simple to hunt them down, and doing so may even present some apps you’ll be able to’t even keep in mind giving any permissions to.

Apps have completely different causes for wanting entry to “Media & Apple Music” in your iPhone. For example, you’ll be able to add playback controls to Google Maps and your Fitbit watch. Video editors comparable to Adobe Clip, Premiere Rush, and Videoleap allow you to select music out of your library so as to add to movies. Shazam can add its personal playlist to Music, and it might probably play content material from Apple Music too. And apps like SongShift want entry to maneuver Apple Music playlists over to Spotify or one other music service.

However do these apps want entry to your Music library or Apple Music account for good? If you happen to now not use these apps and companies, it is most likely safer to chop off their entry. It could not matter a lot in your Music library, however chances are you’ll wish to lock down your Apple Music account simply in case. Both approach, we’ll present you how one can disable permissions for each beneath.

Choice 1: Delete or Offload the App

It is an apparent reply, however when you now not wish to use the app or service, why do you continue to have its app in your iPhone? To delete the app, use one of many following methods. In fact, chances are you’ll not even ensure which apps have the media and Apple Music permissions, so take a look at Choice 2 to learn the way to see that.

  • Lengthy-press its icon on your property display screen, then select “Take away App” or “Delete App” from the fast actions.
  • Lengthy-press its icon on your property display screen, select “Edit Dwelling Display” or “Rearrange Apps” from the fast actions, then faucet the minus (–) signal or (X) to delete the app.
  • Lengthy-press its icon on your property display screen till the fast actions seem and disappear, await every little thing to jiggle, then faucet the minus (–) signal or (X) to delete the app. In iOS 14, you can too long-press the wallpaper to get every little thing jiggling.
  • Go to Settings –> Normal –> iPhone Storage, faucet the app in query, then hit “Delete App.” You would additionally select “Offload App” too, which is able to take away permissions however makes it simpler to reinstall the app later since it’s going to nonetheless be on your property display screen.
  • Open App Retailer, faucet your profile icon, left-swipe on the app if it is listed underneath Obtainable Updates or Up to date Lately, then faucet “Delete.”

Nevertheless, deleting or offloading apps could not eliminate all companies which have entry to your Apple Music account. So you may additionally wish to take a look at Choice Three to make certain.

Choice 2: Revoke the App’s On-Machine Permissions

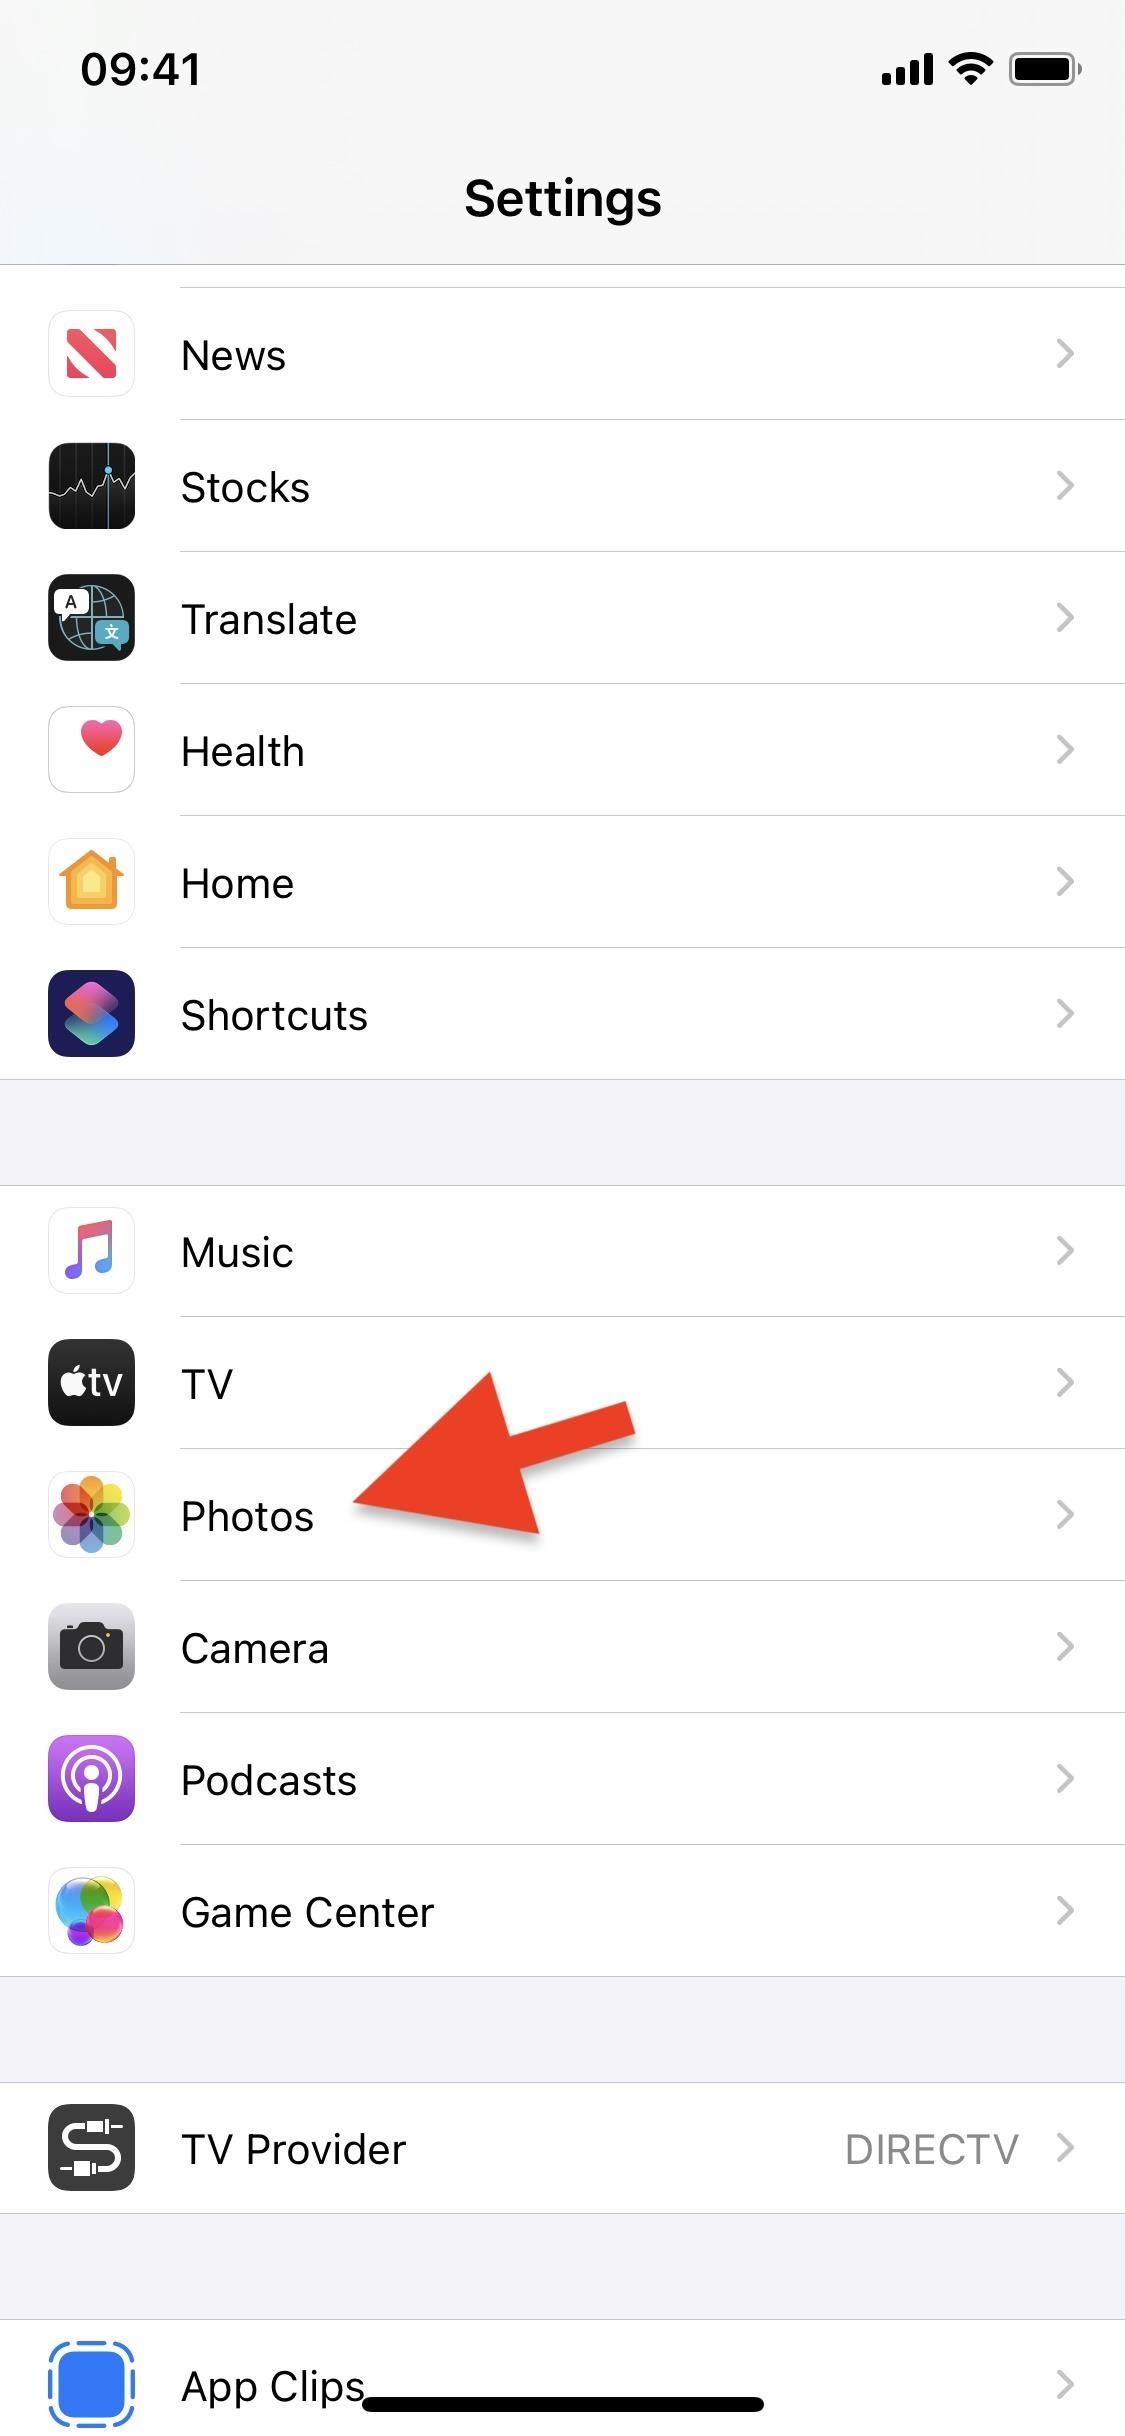
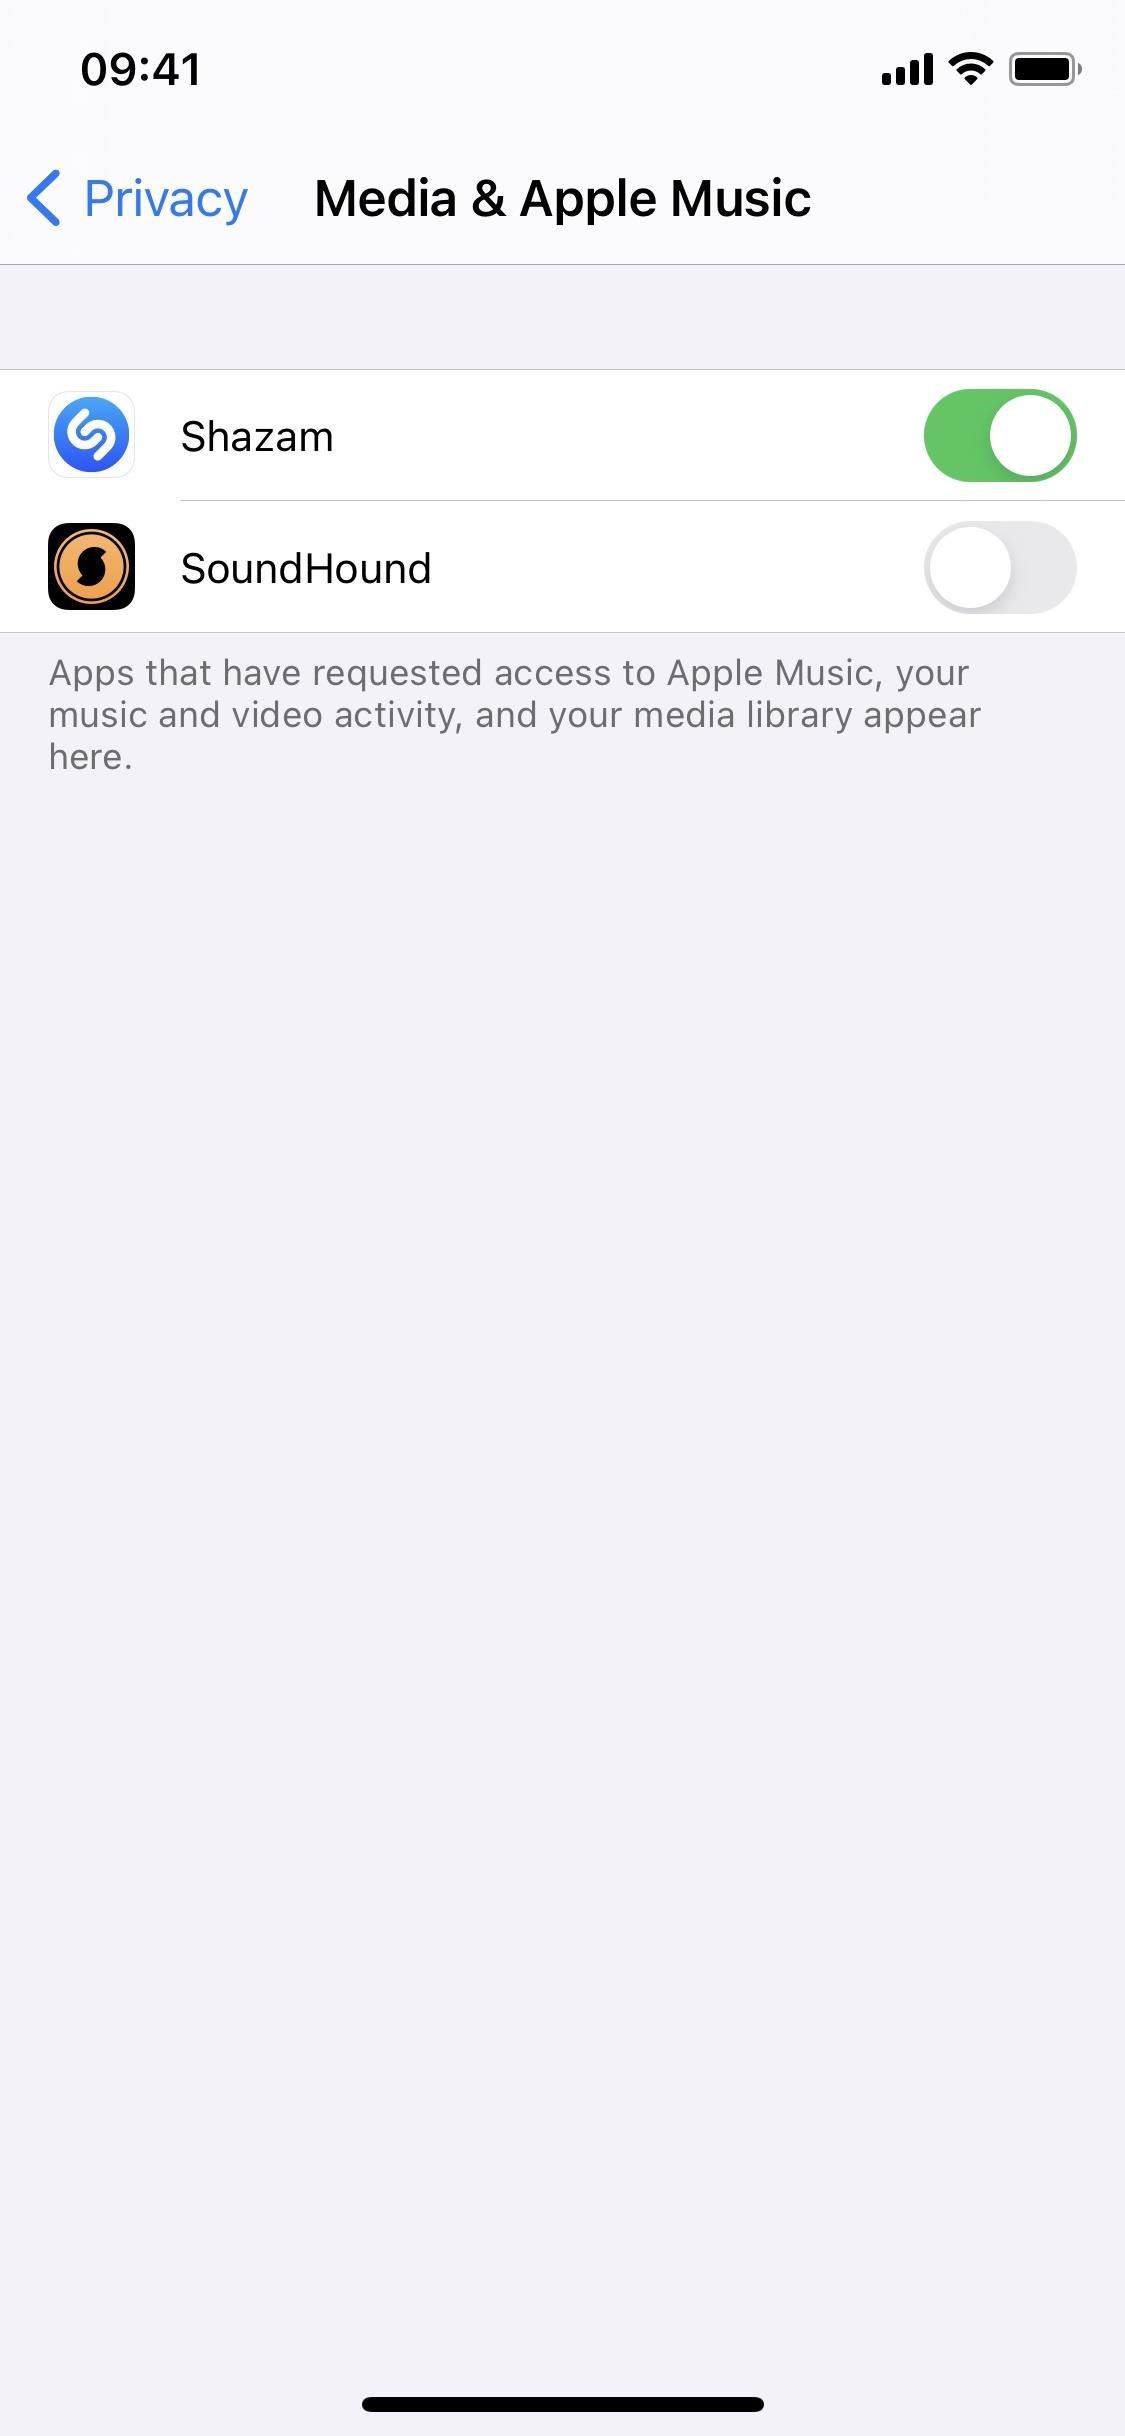
Within the Settings app, you’ll find each third-party app that you’ve got put in from the App Retailer and given or rejected permissions to make use of your media library and Apple Music account. Simply go to “Privateness” in Settings, then faucet “Media & Apple Music.”

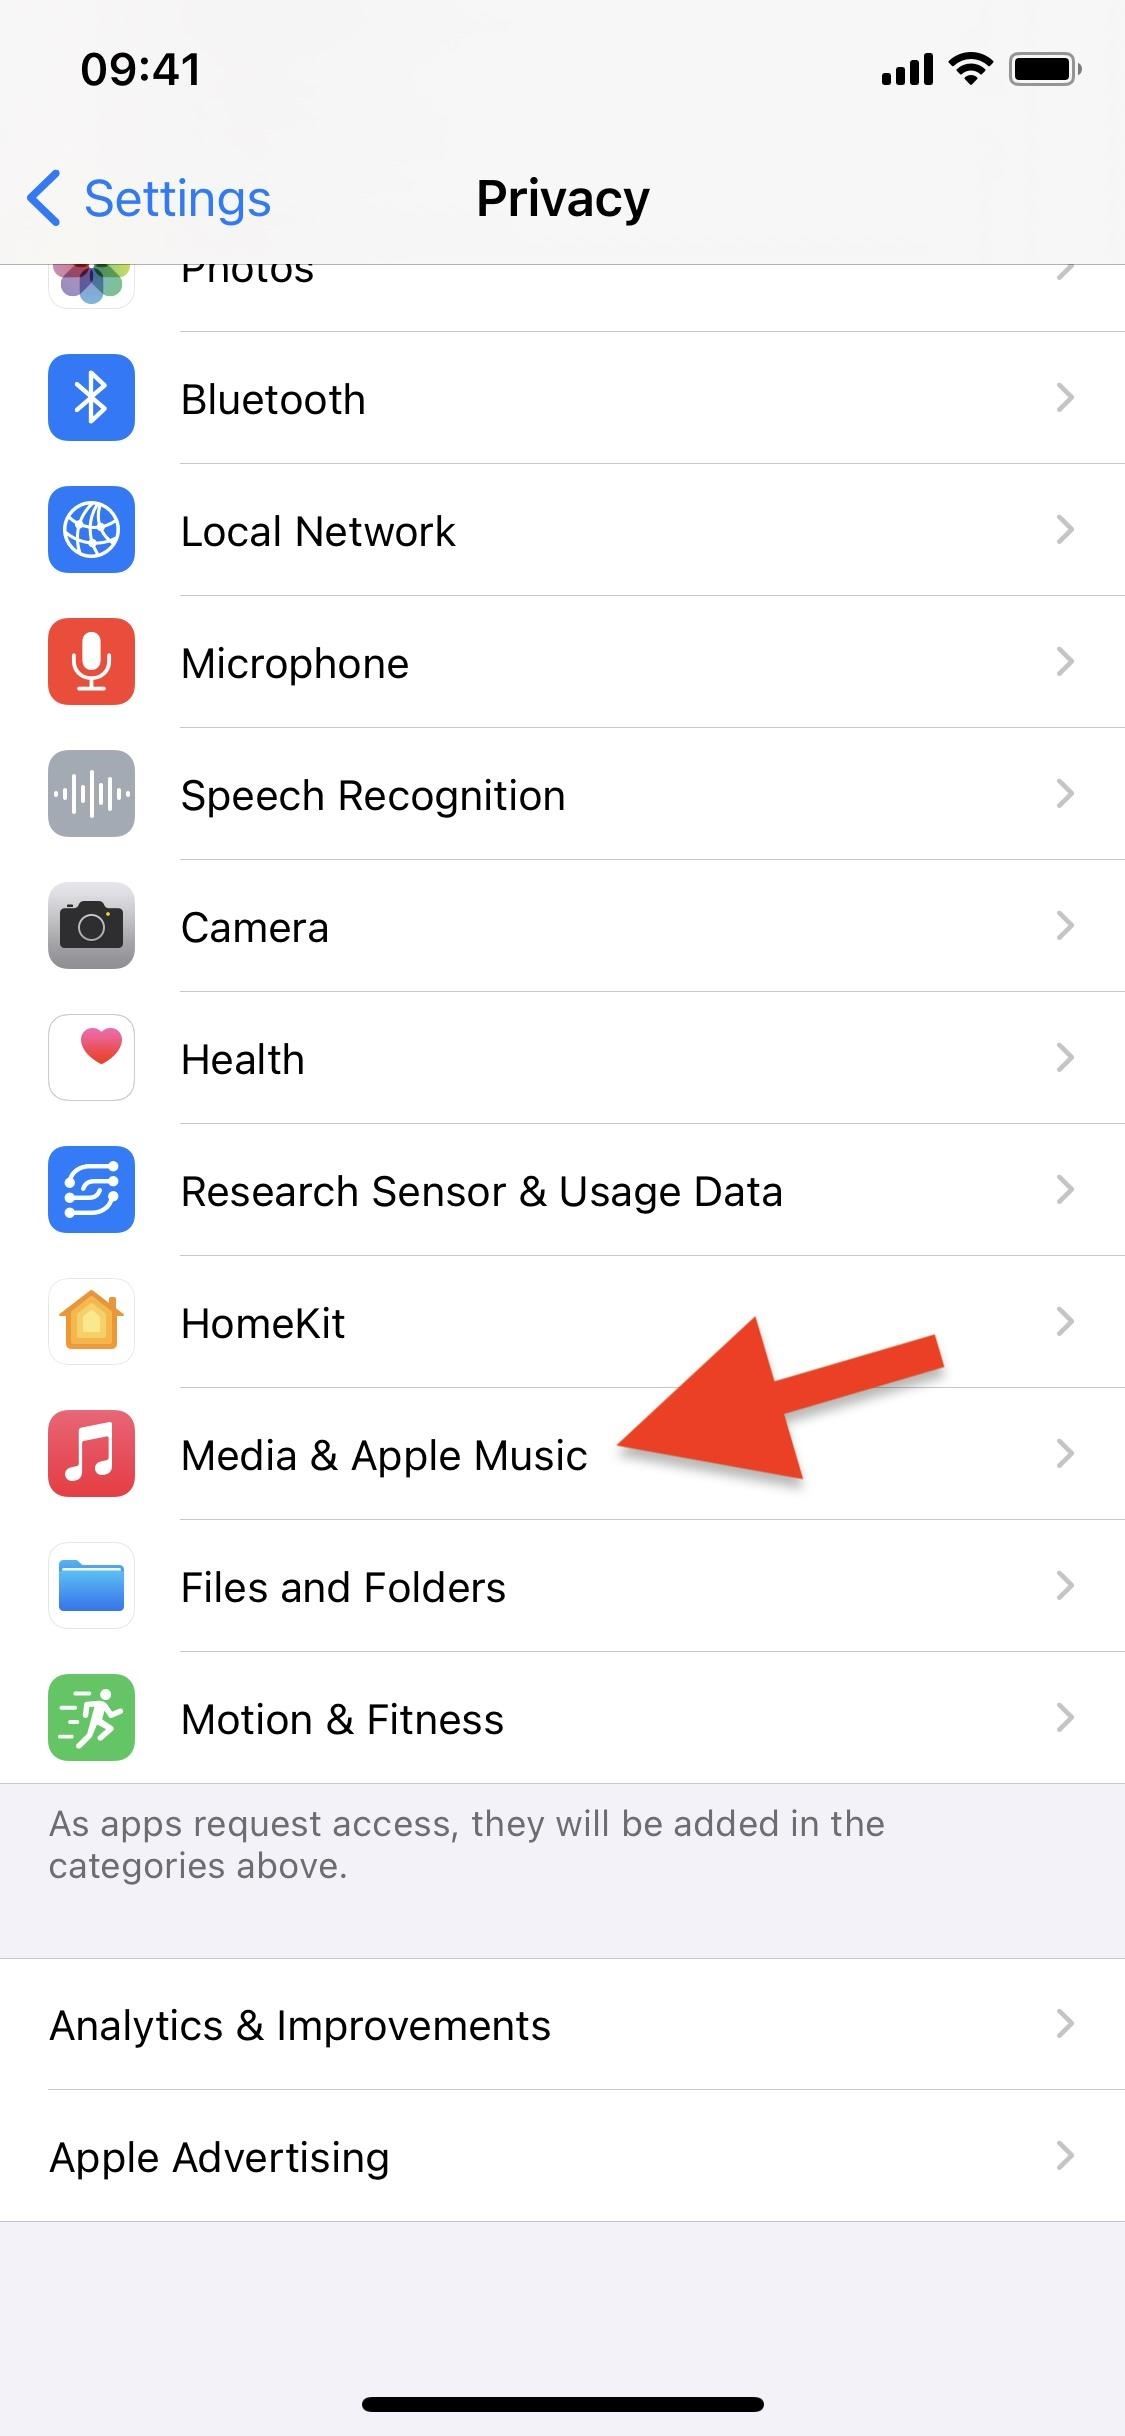
Any apps that you just deleted will not seem right here since they now not have entry to your gadget. The identical goes for offloaded apps. So you may solely see apps that you just nonetheless have put in within the checklist.

To remove entry, easy toggle the app’s change to off. It’s going to revoke entry to your media library and Apple Music account, so you may want to provide it again entry right here if you find yourself utilizing the app once more. If you happen to try to make use of a music-related characteristic in an app that you just revoked permissions for, choices might be grayed out, otherwise you’ll get a pop-up saying that you must return to Settings to repair it.

Nevertheless, revoking permissions from the “Media & Music Library” menu could not eliminate all companies which have entry to your Apple Music account. So you may additionally wish to take a look at Choice Three to make certain.

Choice 3: Take away a Service’s Apple Music Entry

Whereas the above two choices will cease apps from gaining access to your Music app, and due to this fact your library and Apple Music utilization comparable to music and video exercise, it will not eliminate apps the place you logged in to Apple Music straight or that wanted to confirm your subscription info.

For instance, SongShift will ask you for entry to “Media & Apple Music” in order that it might probably entry your native library to detect good playlists and different media. Nevertheless, it additionally wants entry to your iCloud library on Apple Music to confirm you might have an Apple Music subscription and to see your historical past.

Apart from SongShift, your Apple TV could have entry to Apple Music so that you could hearken to songs in your tv. After which there’s the HomePod too. Amazon Alexa and Sonos want entry to Apple Music to play music in your good audio system.

To search out and prohibit these companies out of your Apple Music account, there are a number of methods to get to the place you must be, with the primary choice being the best:

  • From Music: Faucet in your profile icon from “For You” or “Pay attention Now.” (iOS 14 and underneath)
  • From Settings: Faucet your title up high, choose “iTunes & App Shops,” faucet your Apple ID, select “View Apple ID” on the pop-up, then faucet “Apple Music” underneath Account Entry. (iOS 13 and underneath)
  • From Settings: Faucet your title up high, choose “Media & Purchases,” then faucet “Apple Music” underneath Account Entry. (iOS 14 solely)
  • From App Retailer: Faucet in your profile icon, select your Apple ID account, then faucet “Apple Music” underneath Account Entry. (iOS 14 and underneath)
  • From iTunes Retailer: Faucet your Apple ID on the backside, select “View Apple ID” on the pop-up, then faucet “Apple Music” underneath Account Entry. (iOS 14 and underneath)
  • From TV: Faucet in your profile icon in “Watch Now,” select your Apple ID account, then faucet “Apple Music” underneath Account Entry. (iOS 14 and underneath)
  • From Books: Faucet your profile icon in “Studying Now,” select “View Account Settings,” choose that once more on the pop-up, then faucet “Apple Music” underneath Account Entry. (iOS 14 and underneath)

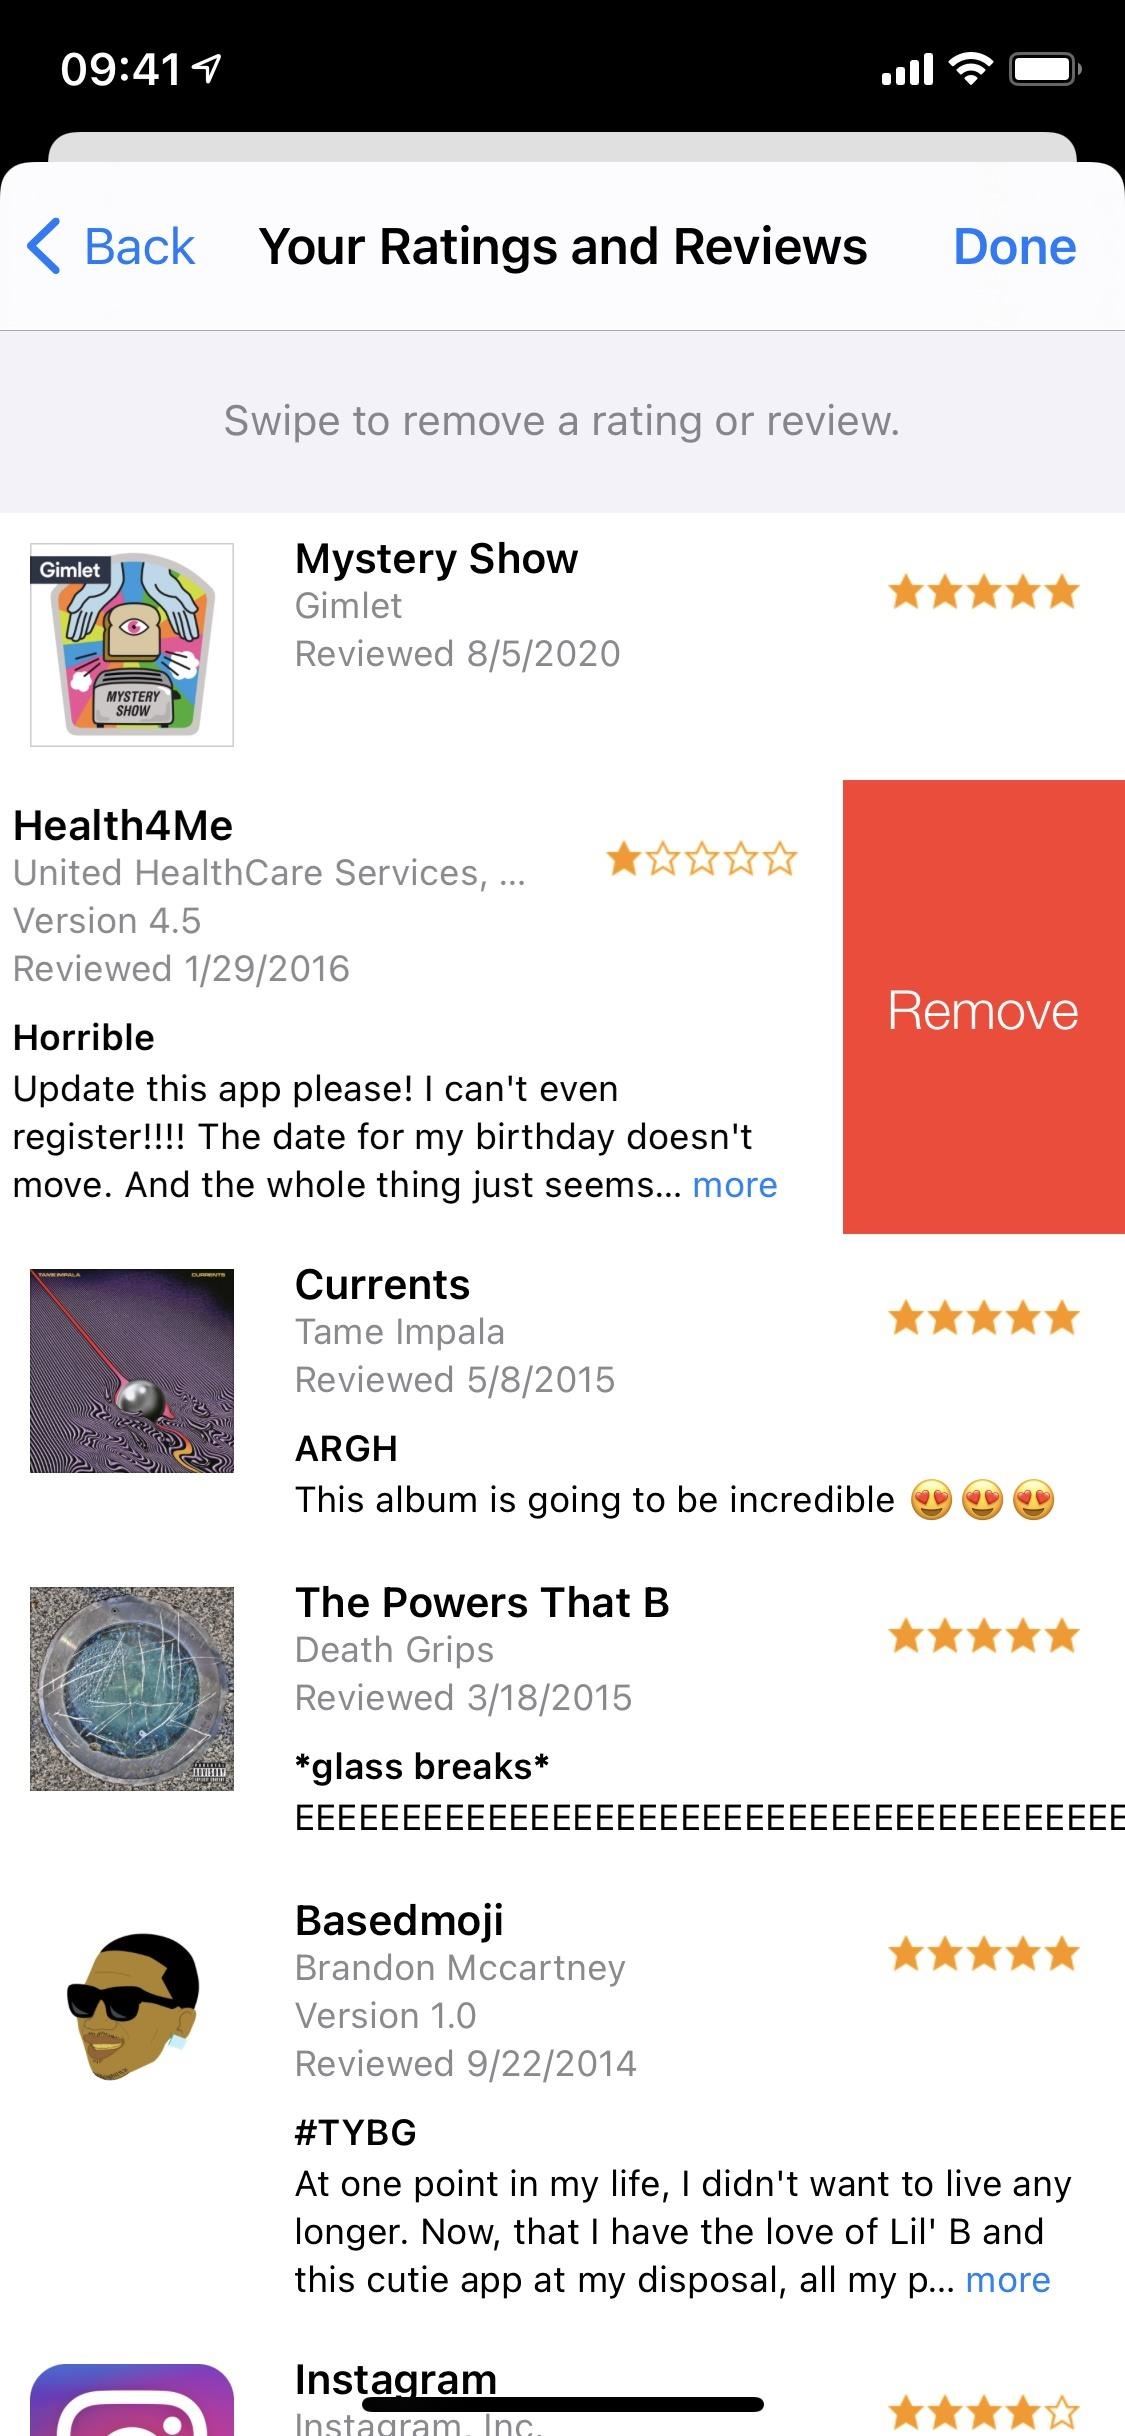
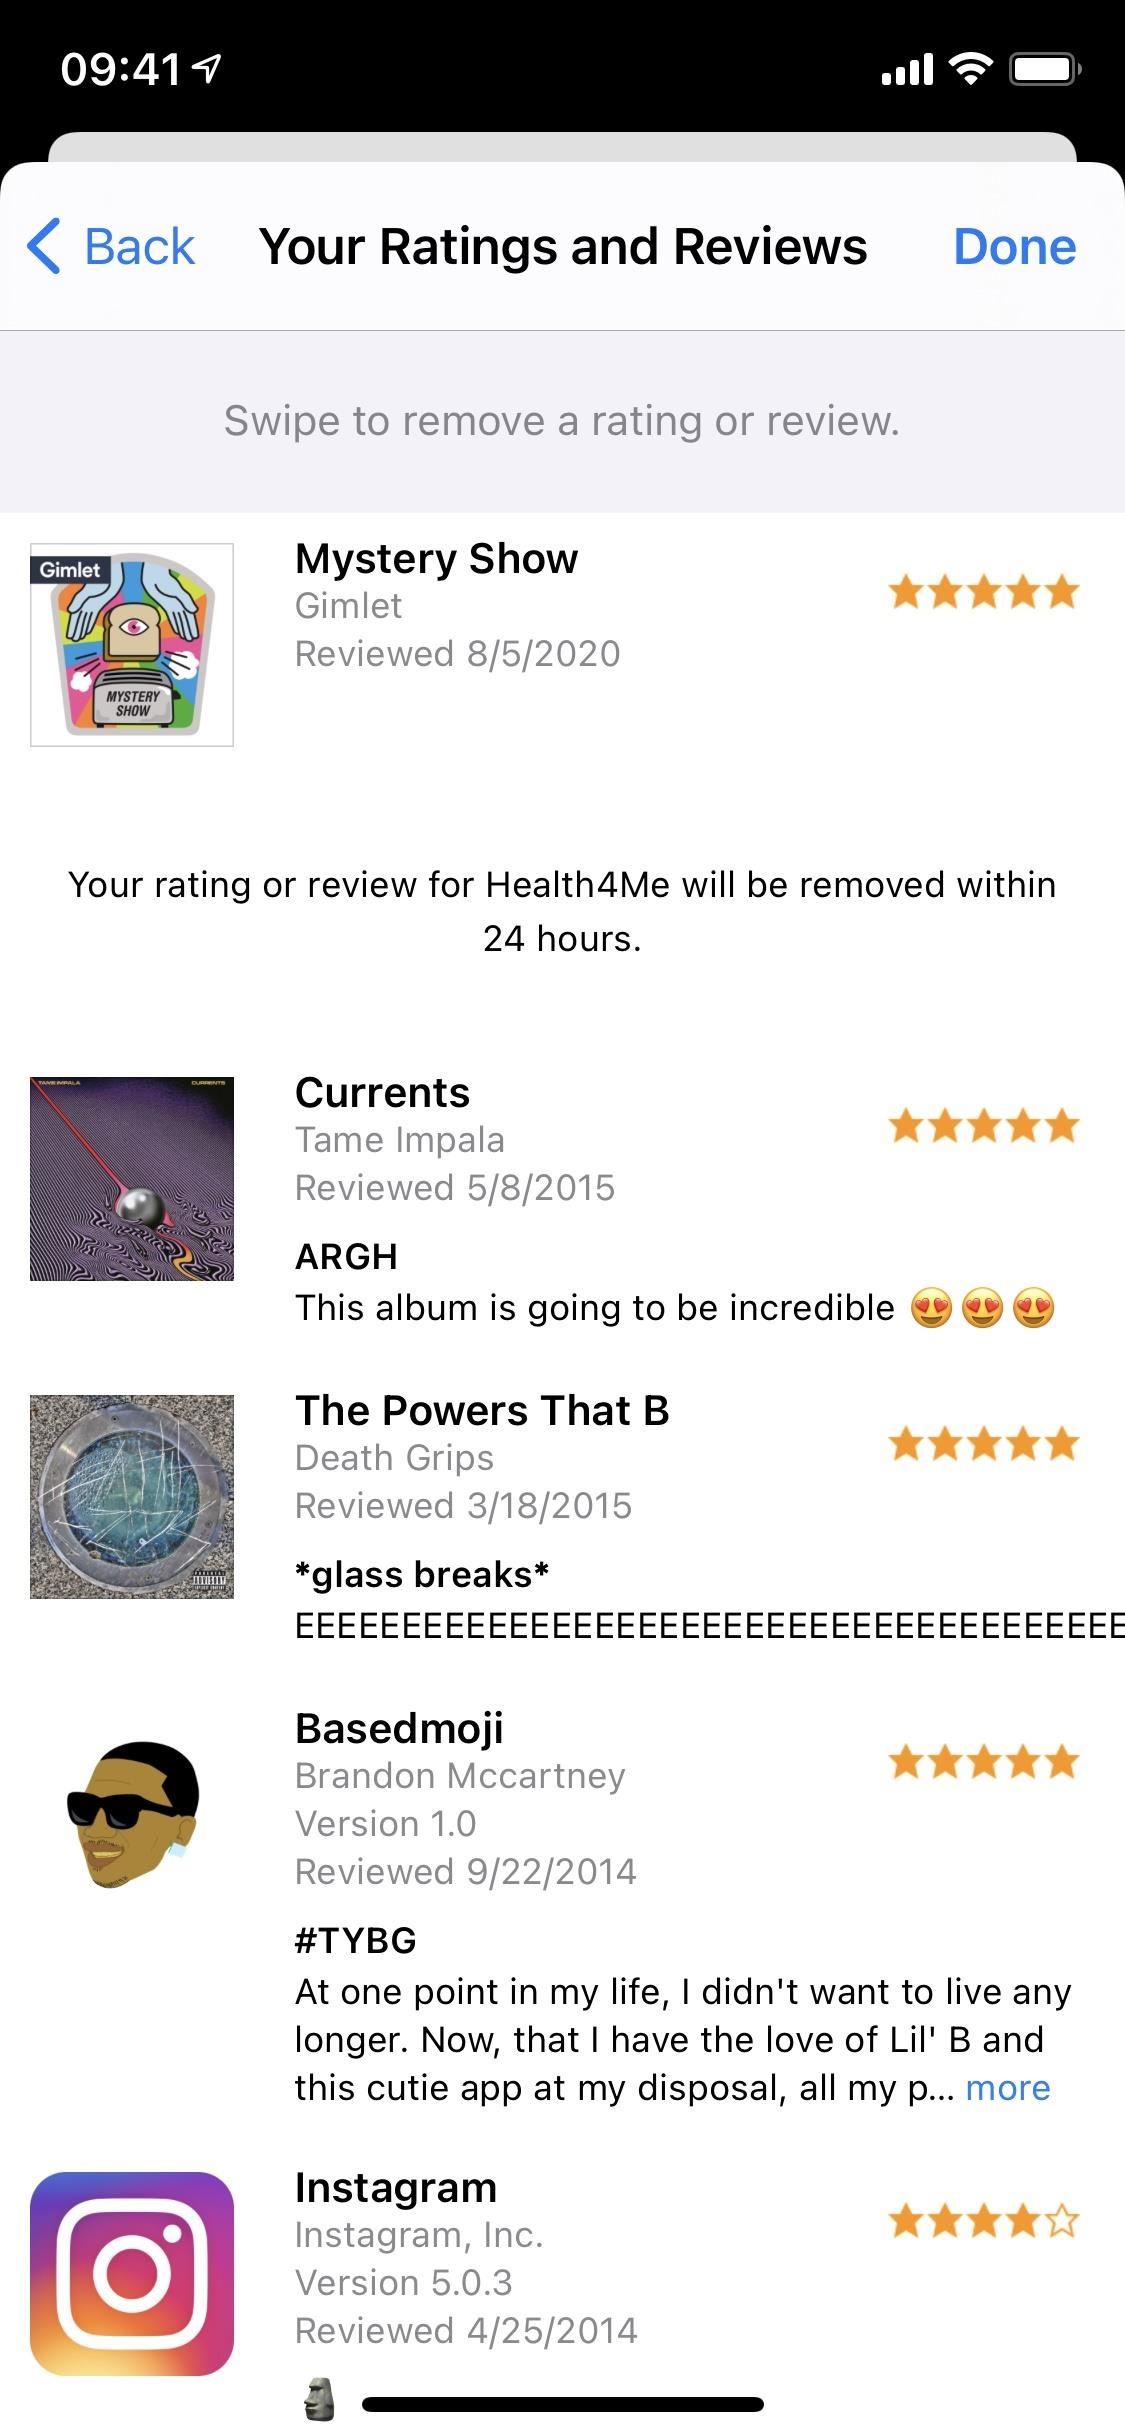
If you happen to used the Music app route, you’d see the entire companies which are linked to Apple Music underneath the Apps with Entry part. When you do not see it, there are not any companies linked. If you happen to used any of the opposite strategies above and could not discover “Apple Music” underneath Account Entry, then there are not any companies linked. In any other case, you may be on a web page with nothing however companies linked to Apple Music.

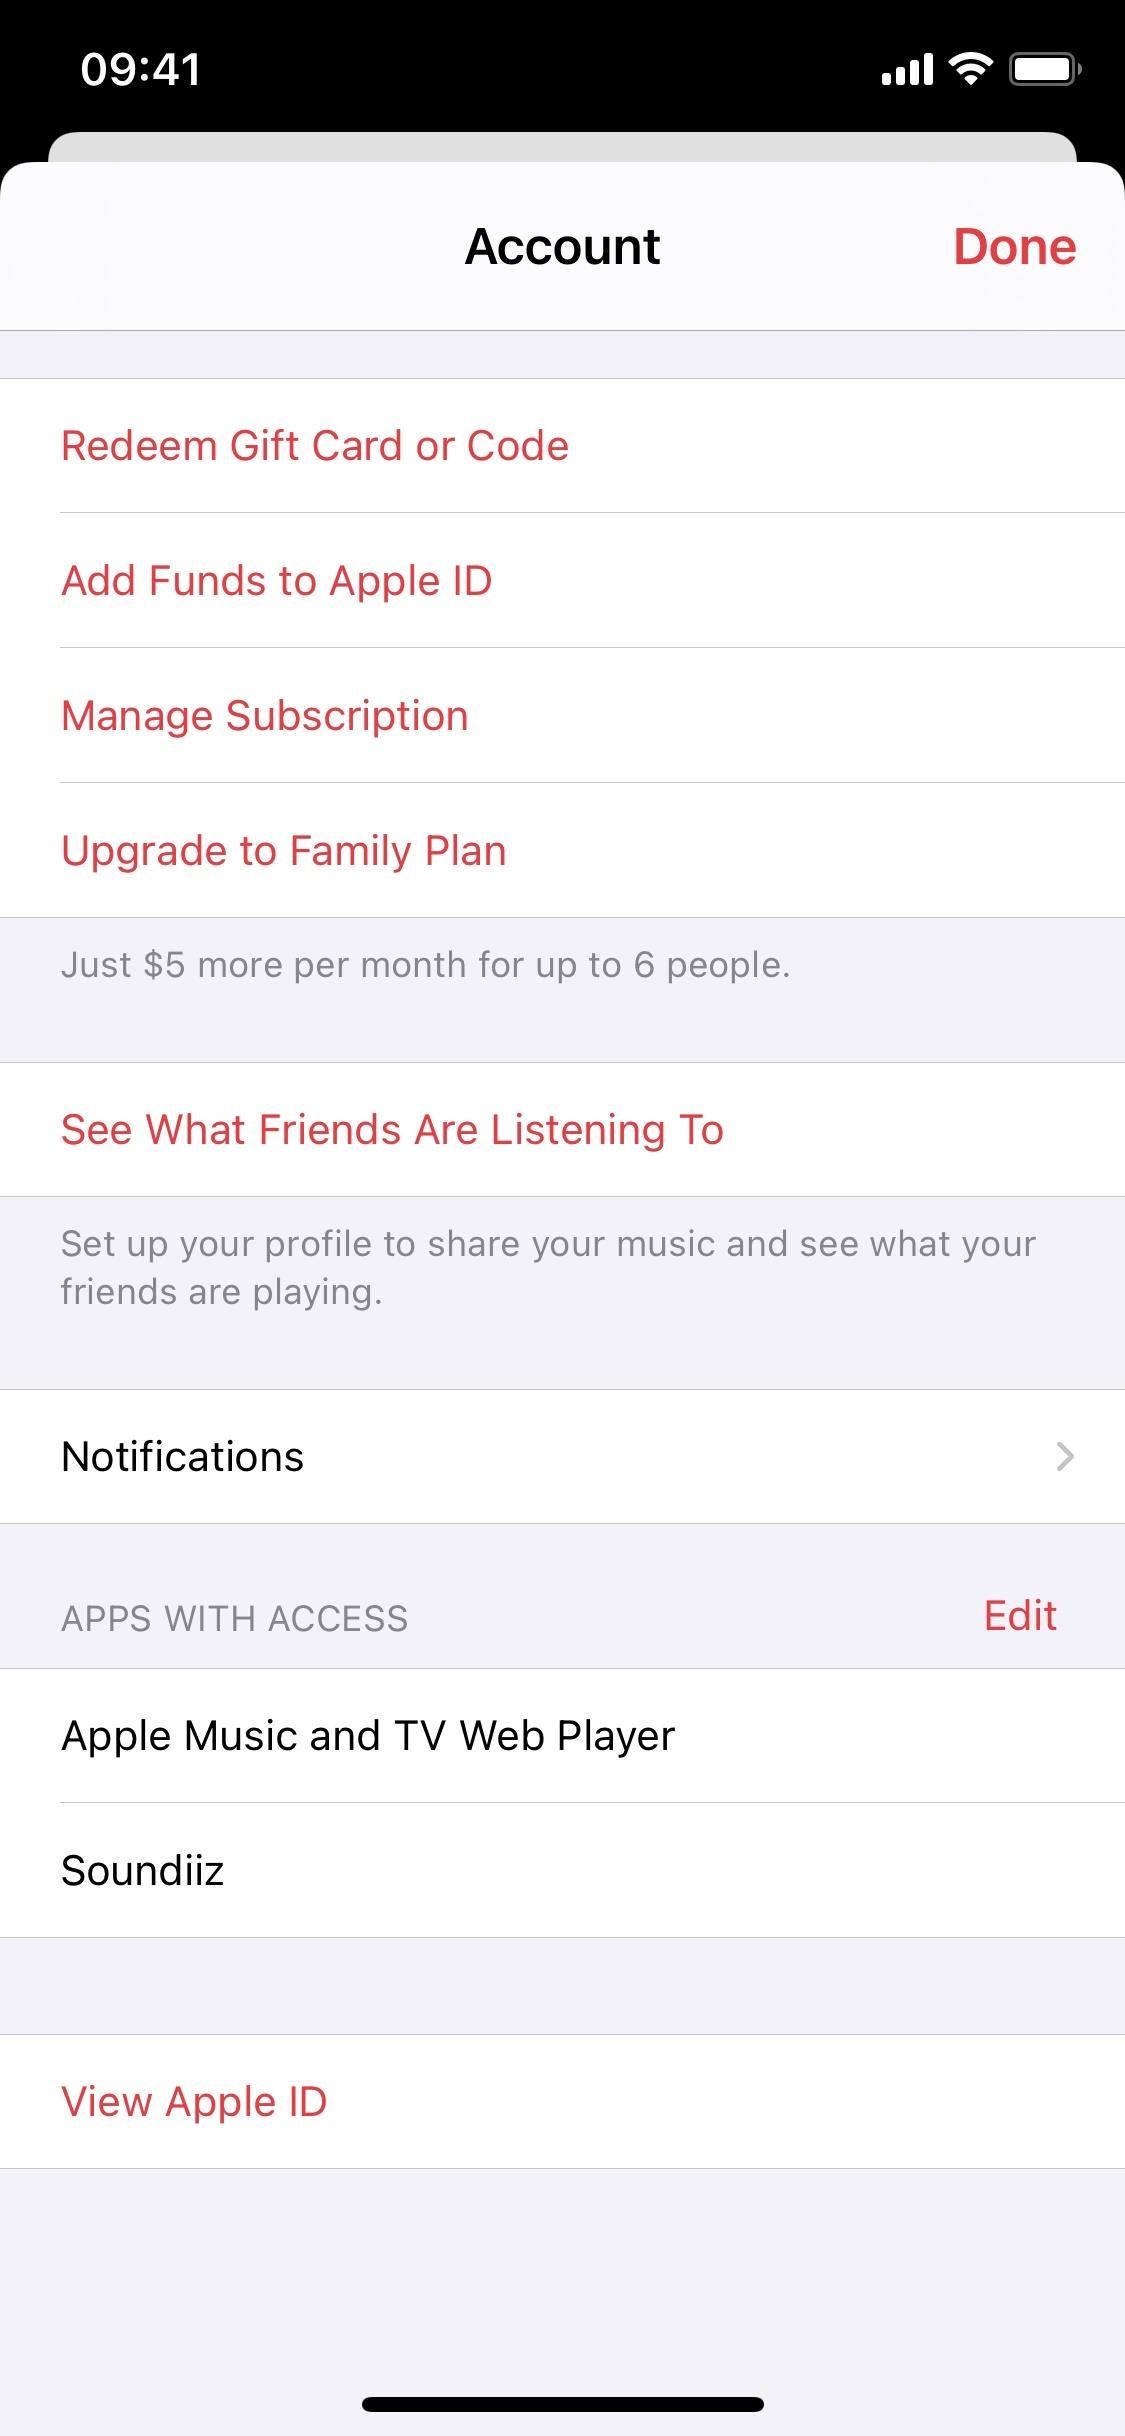
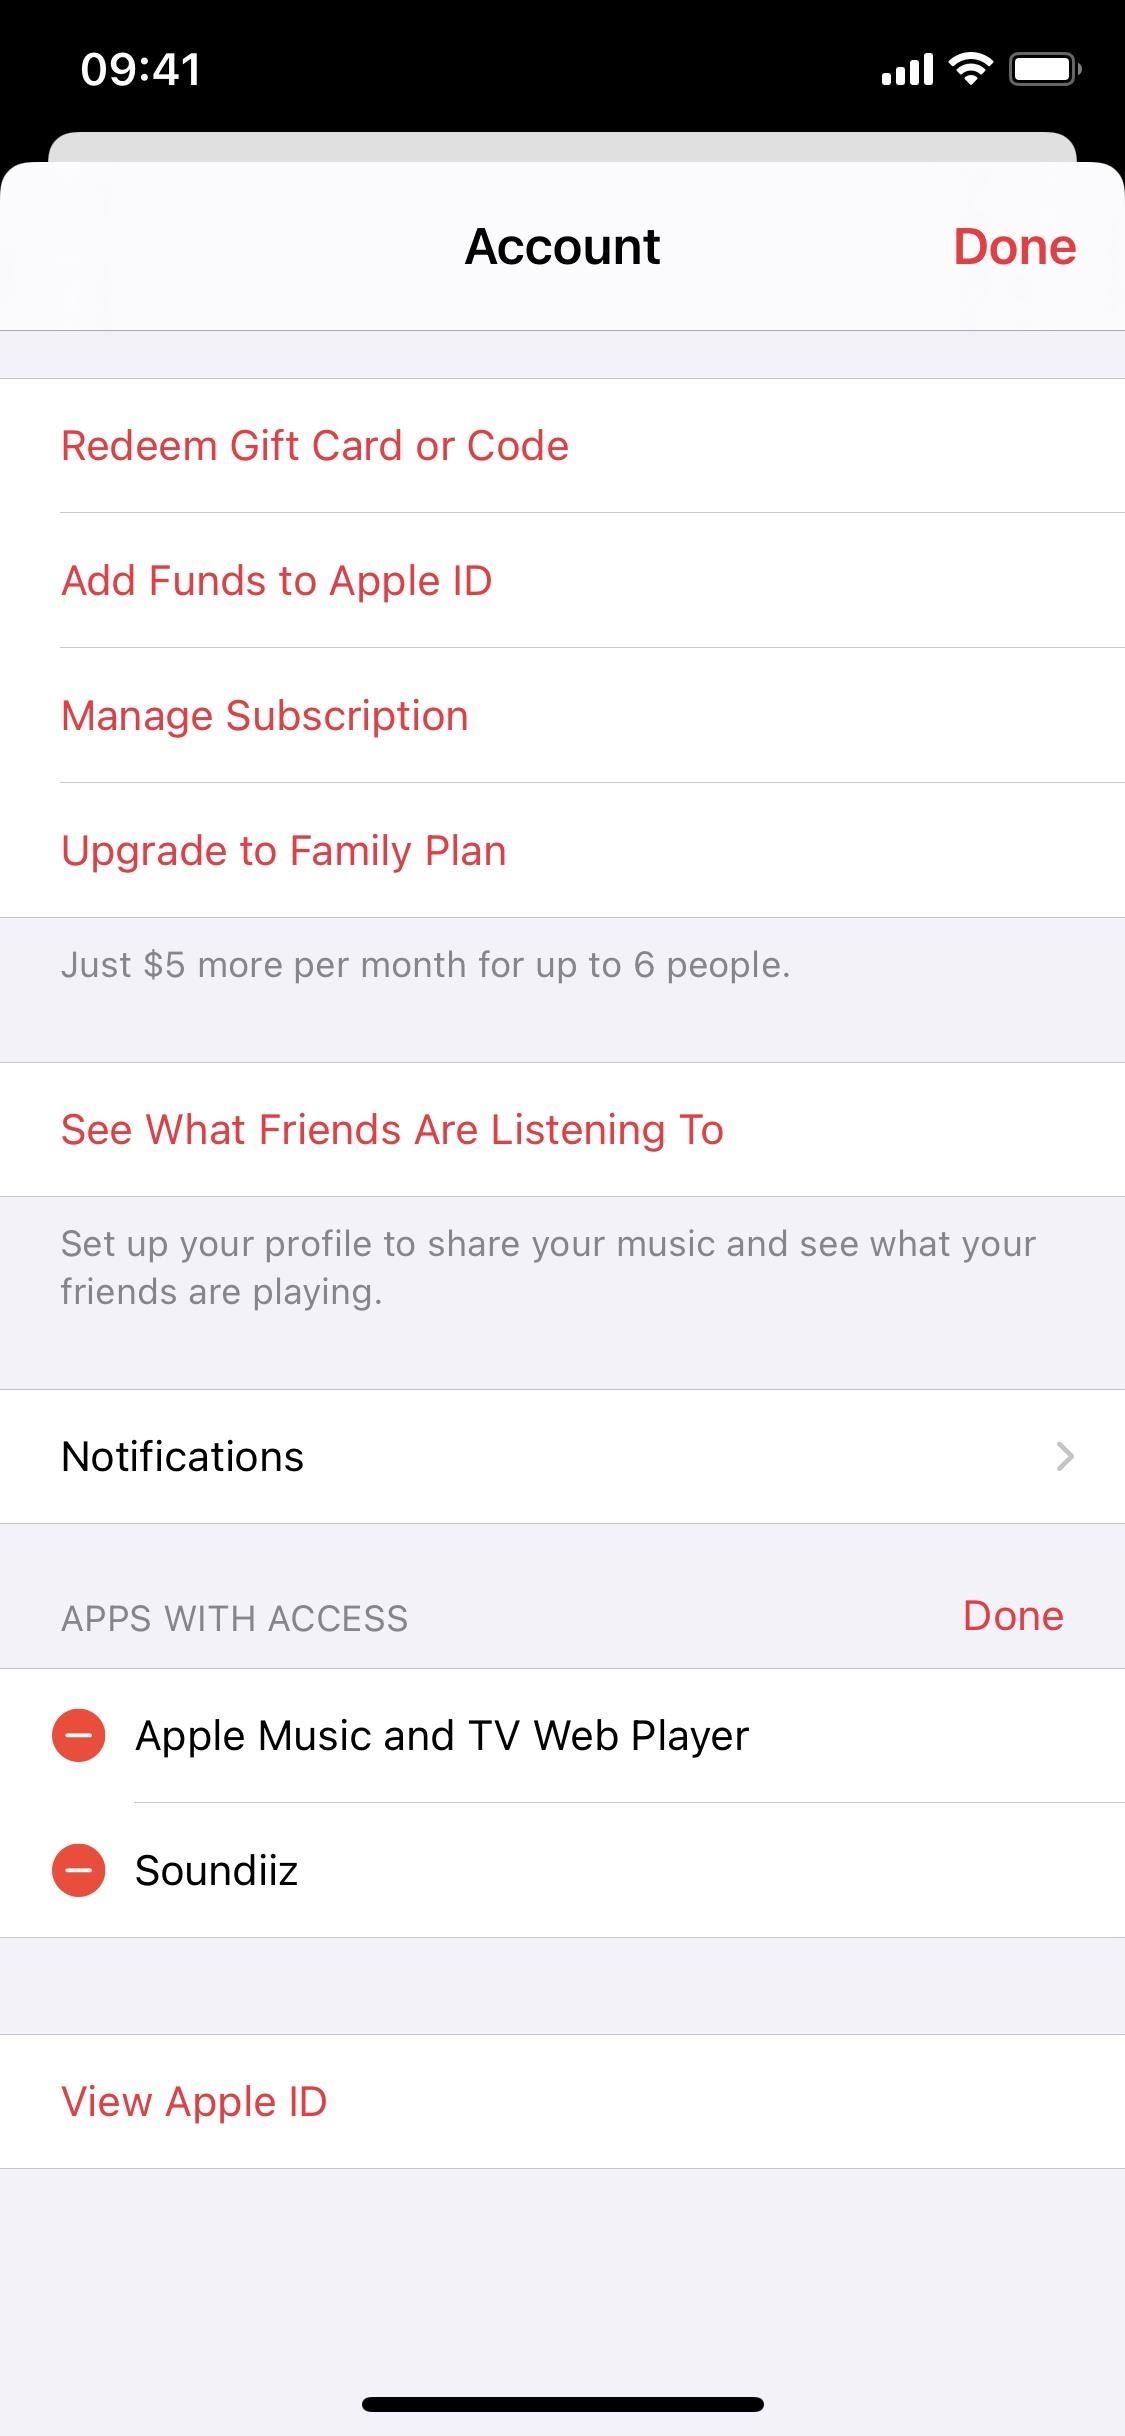
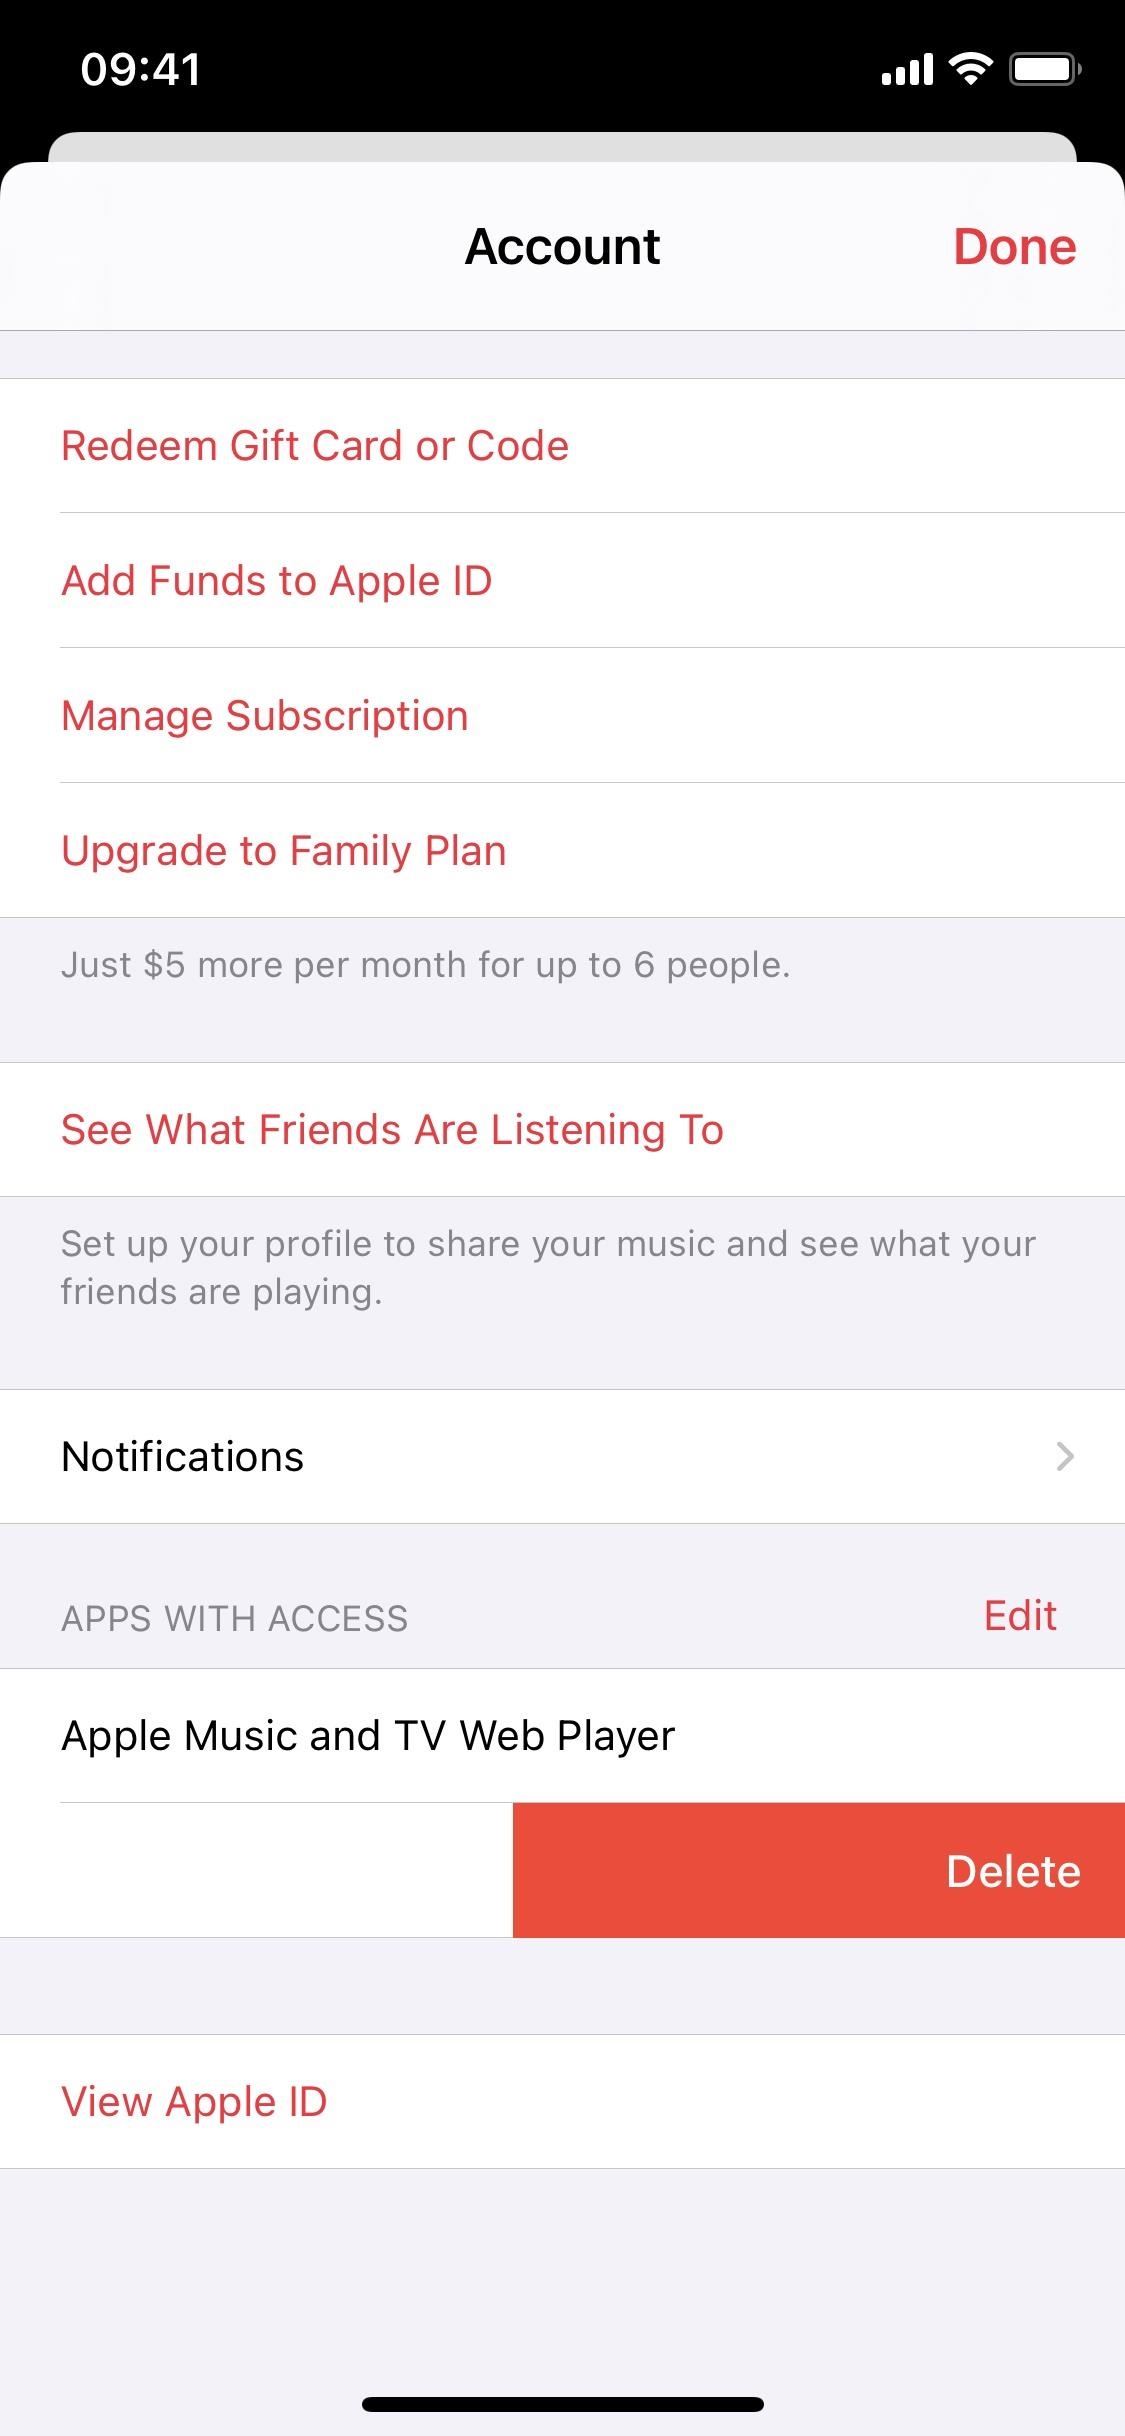
To revoke entry to Apple Music, faucet on “Edit,” hit the pink delete button subsequent to the companies, and choose “Achieved” to complete. Alternatively, swipe left on the service within the checklist, then hit “Delete.”

Hold Your Connection Safe With out a Month-to-month Invoice. Get a lifetime subscription to VPN Limitless for all of your gadgets with a one-time buy from the brand new Gadget Hacks Store, and watch Hulu or Netflix with out regional restrictions.

Purchase Now (80% off) >

Cowl photograph and screenshots by Nelson Aguilar/Gadget Hacks

#how_to

TieLabs HomePage

Apple Releases iOS 13.6.1 for iPhone, Adds Bug Fixes for Exposure Notifications, Thermal Management & Automated Storage « iOS & iPhone :: Gadget Hacks

Apple simply launched iOS 13.6.1 for iPhone at the moment, Wednesday, Aug. 12. The replace is the newest public replace for iPhones since iOS 13.6, which Apple launched 28 days in the past.

Apple launched this replace simply previous 1 p.m. PDT. We anticipated Apple would launch iOS 13.6.1 at 10 a.m. PDT, the corporate’s normal launch time for software program updates, however the firm has change into considerably unpredictable with software program updates.

What will we anticipate to see from 13.6.1? In keeping with Google, Google Maps is coming to CarPlay Dashboard. CarPlay Dashboard lets you use two apps directly in a single show, so this new replace lets you use Google Maps whereas concurrently managing music playback.

It is not clear at the moment, nevertheless, if this characteristic is in reality part of 13.6.1. Google Maps did launch an iOS replace the identical day, however neither that replace nor 13.6.1 point out the characteristic of their launch notes.

In keeping with 13.6.1’s launch notes, the replace provides three bug fixes for iPhones:

  • Addresses a problem the place unneeded system information recordsdata may not be robotically deleted when accessible storage is low
  • Fixes a thermal administration problem that induced some shows to exhibit a inexperienced tint
  • Fixes a problem the place Publicity Notifications might be disabled for some customers

Any iPhone that may run iOS 13 is eligible to replace to 13.6.1. That features the next:

  • iPhone 11
  • iPhone 11 Professional
  • iPhone 11 Professional Max
  • iPhone SE (2nd Gen)
  • iPhone XS
  • iPhone XS Max
  • iPhone XR
  • iPhone X
  • iPhone 8
  • iPhone Eight Plus
  • iPhone 7
  • iPhone 7 Plus
  • iPhone 6S
  • iPhone 6S Plus
  • iPhone SE (1st Gen)

To obtain iOS 13.6.1, simply open Settings in your iPhone, then head to Common -> Software program Replace. From right here, observe the on-screen directions to obtain and set up the brand new replace. When you’ve got “Automated Updates” enabled, you may merely let your iPhone replace to 13.6.1 in a single day.

Hold Your Connection Safe With out a Month-to-month Invoice. Get a lifetime subscription to VPN Limitless for all of your units with a one-time buy from the brand new Gadget Hacks Store, and watch Hulu or Netflix with out regional restrictions.

Purchase Now (80% off) >

Cowl picture by Jake Peterson/Gadget Hacks

#how_to
https://centramic.com/

How to Share Your iPhone Photos & Videos with a Disappearing Link That Expires Automatically « iOS & iPhone :: Gadget Hacks

The best way you share a gaggle of pictures and movies in your iPhone is fairly easy; simply choose a number of gadgets, then select a service or platform to ship them by. Simplicity is not at all times the most suitable choice, although, and on this case, there’s a greater means than letting these recordsdata ship or add individually, one after the other.

If a gaggle of images and movies are despatched one after the other, it could actually take some time (MMS messages may be very gradual), they’ll fail (when you’ve got unhealthy sign), numerous knowledge could also be consumed (in the event that they’re despatched and obtained over cellular knowledge), and the recordsdata can refill a bunch of area (some folks could solely have 16 GB on their telephone).

When any of these points come up, the very best factor to do is to share these hefty photographs and movies collectively by way of a disappearing iCloud hyperlink. With certainly one of these hyperlinks, all the media will likely be grouped in a handy iCloud album that lasts for 30 days. You’ll be able to even revoke entry manually if you wish to cease sharing earlier. And if you happen to want to share only a single picture or video by way of iCloud, you are able to do that too.

How iCloud Hyperlinks Work

At any time when an iCloud hyperlink is dwell for a picture or video or group of images and movies, whoever you share the hyperlink with can view and obtain your pictures and movies till the 30 days are up or till you pull again their entry manually.

If a recipient has an iPhone too, and so they have pictures and movies taken from the identical time and place that you’ve got simply shared, they could be requested so as to add these to the album. So iCloud hyperlinks additionally function a strategy to push others into sharing the wealth so you possibly can take a look at all of their cool photographs that you simply’re in.

In some instances, iCloud hyperlinks are generated robotically when sharing from the Pictures app. Particularly, in case your group of pictures and movies is very large, and also you’re sending the recordsdata by way of Messages as a textual content or iMessage, iOS could determine that an iCloud hyperlink to your media is the very best method for all events concerned. Generally it feels random when it occurs, and it could look like there isn’t any strategy to get an iCloud hyperlink each time — not simply sporadically — however there may be.

Step 1: Allow iCloud Pictures (If Vital)

The one means you possibly can share an iCloud hyperlink is if you happen to allow iCloud Pictures — which uploads your pictures and movies to iCloud for safekeeping. Though it is extremely possible that you’ve got iCloud Pictures enabled, you possibly can nonetheless test. In Settings, go to “Pictures,” and ensure the “iCloud Pictures” swap is toggled on.

Alternatively, you possibly can go to Settings, faucet your identify up prime, select “iCloud,” then “Pictures,” and ensure “iCloud Pictures” is on.

With it on, all your pictures and movies will likely be uploaded robotically to iCloud, and it’ll all sync throughout all your iCloud-connected units. In case you solely have a 5 GB free iCloud storage plan, you might must improve to a paid one when you’ve got numerous media (50 GB is simply $0.99 per thirty days).

Discover the “Shared Albums” swap above? Whereas we’re sharing albums with iCloud hyperlinks, it is not the identical factor as that, so don’t fret about if that is off or not.

Step 2: Choose Pictures & Movies to Share

Now it is time to choose the pictures and movies you need to share briefly. In Pictures, discover the content material within the “Pictures” or “Albums” or “Search” tab that you simply need to share. Within the grid view, faucet “Choose,” then select every picture or video you need within the iCloud album. Alternatively, once you view a single picture or video and faucet the share button, you possibly can swipe left or proper to see extra content material to pick out.

There isn’t a restrict to what number of gadgets you possibly can ship by way of an iCloud hyperlink, so go loopy, however it’ll take longer to create a hyperlink if you happen to select extra content material.

Step 3: Faucet the Share Button

Once you’ve chosen all the media that you simply need to share from Pictures, faucet the Share button, which appears like a clean picture with an arrow pointing upward.

Step 4: Take away Areas from Your Content material (Non-obligatory)

Again when iOS 13 was launched, Apple launched a local characteristic to simply take away location metadata from any picture or video that you simply share. That means, others cannot monitor the place you have been or are. If you do not need geotags included for media in your iCloud hyperlink, disable them now.

Within the Share sheet, faucet “Choices,” toggle off “Location,” then hit “Executed,” and the metadata will likely be scrubbed out of your media for this occasion solely.

Step 5: Create the iCloud Hyperlink

If you are going to ship the content material by way of Messages and you have chosen sufficient to share, when you faucet “Messages” from the share extensions record, it could create an iCloud hyperlink robotically. If not, you possibly can nonetheless make one manually.

Within the Share sheet, scroll all the way down to the record of actions, then select “Create iCloud Hyperlink” to generate an iCloud hyperlink on your pictures and movies. As talked about earlier than, the extra footage and movies you share, the longer it’ll take to create an iCloud hyperlink, however it should not be longer than 30 seconds.

Step 6: Share the iCloud Hyperlink Any Approach You Need

As soon as the iCloud hyperlink is copied to your clipboard, you possibly can share it by way of a message, an e-mail, social media, and extra — even AirDrop in order for you. When sharing by way of Messages, in addition to different choose apps, you will get a preview of the pictures within the iCloud hyperlink once you share it. For many every little thing else, it’s going to simply seem as a hyperlink.

Viewing Issues from a Recipient’s Perspective

As for the recipient of your iCloud hyperlink, they will be capable to simply view your pictures and movies and obtain them to their machine. In the event that they’re on an iPhone, opening the hyperlink will take them on to the Pictures app, the place they’ll undergo the album of pictures and movies they obtain.

For a month, they will be capable to entry this folder from the “For You” web page in Pictures, and in the event that they need to obtain the pictures and movies, they’ll faucet on “Add All” or choose particular person recordsdata to maintain them past the 30 days. If they’ve content material of their iCloud Pictures library that matches the identical time and placement of your shared media, they could be requested so as to add these to the shared album so you possibly can see them.

In the event that they’re on Android, the method is comparable. As soon as they faucet on the iCloud hyperlink, they will be redirected to their most popular internet browser. From there, they’ll faucet on “Obtain” after which both register to their iCloud (if they’ve one) so as to add the gadgets to their library or obtain on to their Android machine.

In our expertise, downloads on Android at all times compile as a .zip file, so in case your Android recipient would not know find out how to open .zip recordsdata on their machine, an iCloud hyperlink will not be the most suitable choice.

Viewing iCloud Album Hyperlinks You’ve got Shared & Obtained

Each dwell iCloud hyperlink that hasn’t expired will dwell as an album in your Pictures app. To view your shared iCloud hyperlinks, go “For You” in Pictures, then discover the Not too long ago Shared part, which strikes round relying on once you final despatched or obtained an iCloud hyperlink.

Right here, you will see a preview of your shared pictures and movies, the variety of gadgets, the dates when the images and movies have been taken, and when the iCloud hyperlink will expire. If somebody has shared an iCloud hyperlink with you, it’ll additionally seem right here.

In every album, you can see all the linked pictures and movies. Plus, you possibly can faucet on the ellipsis (•••) button to repeat the iCloud hyperlink to your clipboard for additional sharing (you can even copy the hyperlink from the short actions on the shared album’s preview).

Canceling Shared iCloud Album Hyperlinks Early

By default, any iCloud hyperlink you share is dwell for 30 days. That signifies that the individuals who obtain it have a month to view and obtain the pictures and movies within the hyperlink. Though you possibly can’t alter the 30-day restrict, you possibly can cease sharing the hyperlink with everybody who has it.

When viewing the shared album’s preview from the Not too long ago Shared part in “For You,” you possibly can long-press the preview, then select “Cease Sharing” from the short actions, then “Cease Sharing” once more to substantiate. Alternatively, when you’ve got the shared album opened, faucet on the ellipsis (•••) button, then choose “Cease Sharing” from the motion sheet, then “Cease Sharing” once more to substantiate.

Anybody that has entry to your pictures and movies by way of the iCloud hyperlink will likely be eliminated, and so they’ll not be capable to view or obtain the gadgets.

Preserve Your Connection Safe With out a Month-to-month Invoice. Get a lifetime subscription to VPN Limitless for all of your units with a one-time buy from the brand new Gadget Hacks Store, and watch Hulu or Netflix with out regional restrictions.

Purchase Now (80% off) >

Cowl picture and screenshots by Nelson Aguilar/Gadget Hacks

#how_to
https://centramic.com/

You Can Shoot Better-Looking Videos on Your iPhone if You Change This One Setting « iOS & iPhone :: Gadget Hacks

Whereas most smartphones nowadays take nice video, the iPhone is the digicam to beat. Current fashions just like the iPhone 11 shoot in 4K decision from each digicam, and even a funds gadget just like the iPhone SE delivers a wonderful 4K picture from the rear shooter. That mentioned, if you have not touched your digicam settings since taking it out of the field, you are doubtless lacking out.

Each mannequin for the reason that iPhone 6S is able to taking pictures 4K video (2160p), however Apple insists on setting the default decision to 1080p HD. Sure, that is nonetheless high-definition, solely it is not the utmost high quality your iPhone is able to utilizing for video shoots. Until you are fearful about cupboard space (4K video can take up plenty of room), try to be targeted on recording the most effective video doable.

Technique 1: Swap to 4K from the Digital camera App

For those who’re operating iOS 14 on any iPhone mannequin that helps the software program, or iOS 13.2 or afterward an iPhone 11, 11 Professional, 11 Professional Max, or SE (2nd era), you possibly can change your video decision proper within the Digital camera app.

Simply faucet on the “HD” that seems within the toolbar, which signifies 1080p mode. Whenever you do, your iPhone ought to change to 4K, with out you needing to backtrack over to Settings. For those who already see “4K,” meaning your iPhone is already taking pictures on the highest high quality doable. Nevertheless, for those who’re utilizing the entrance digicam as an alternative of the rear, solely the iPhone 11 sequence can select 4K recordings.

At this level, you can even faucet the “24,” “30,” or “60” that is subsequent to 4K to vary the body fee too. The 24 will make your video look choppier, like movie; 30 will appear like commonplace video; 60 will make captured movement look very clean. The iPhone eight and later can use any of these body charges with the rear digicam, whereas older units are restricted to “30” frames per second (fps). The iPhone 11 sequence can change body charges on the entrance digicam too.

Simply know that any adjustments you make immediately in Digital camera will solely have an effect on that taking pictures session. For those who shut the app, Digital camera will return to the default decision and body fee (see Technique 2 for information on that) whenever you open it again up. “Protect Settings” doesn’t lock it in place both.

What if It is Not Switching Between Resolutions?

If nothing occurs whenever you faucet on “HD” within the toolbar, it is probably not activated in your iPhone but. So, you may want to go to Settings –> Digital camera –> Document Video, then toggle on the “Video Format Management” change.

Technique 2: Swap to 4K from the Settings App

On any iPhone mannequin or iOS model, open Settings, then head to “Digital camera.” From right here, faucet “Document Video,” then select any of the 4K choices. Altering it right here will change it within the Digital camera app instantly.

Identical to in Technique 1, which body fee you select is as much as you. To reiterate, 24 fps will make your video look choppier, like movie; 30 fps will appear like commonplace video; 60 fps will make captured movement look very clean. If it helps, the Apple default is 30 fps. Whichever choice you select will apply to the rear and entrance digicam, although, if the entrance digicam doesn’t assist your most well-liked decision, it’s going to use the following finest one.

No matter decision settings you select right here can be your defaults going ahead. So, as an example you choose 4K at 60 fps, however you alter it to 4K at 24 fps utilizing Technique 1. When the Digital camera closes or occasions out, whenever you return to document video, it’s going to be again at 4K and 60 fps, your defaults.

Preserve Your Connection Safe With no Month-to-month Invoice. Get a lifetime subscription to VPN Limitless for all of your units with a one-time buy from the brand new Gadget Hacks Store, and watch Hulu or Netflix with out regional restrictions.

Purchase Now (80% off) >

Cowl picture, screenshots, and GIFs by Jake Peterson/Gadget Hacks

#how_to
https://centramic.com/

Apple Lets You See All the Ratings & Reviews You’ve Ever Given Apps, Games, Movies, TV, Music, Podcasts & Books « iOS & iPhone :: Gadget Hacks

Voicing your displease with a shoddy third-party app or professing your love for an album you’ve got simply purchased is regular, which is why we have now scores and evaluations. You hate one thing, you write one thing. You’re keen on one thing, you charge it. However emotions change over time, so your scores or evaluations could should be up to date.

In your iPhone, you may depart scores and evaluations for apps, video games, music, TV exhibits, films, books, and even podcasts. And if you happen to charge or evaluate one thing from the App Retailer and different native Apple apps, it stays hooked up to your Apple ID ceaselessly. That “ceaselessly” half makes it potential to seek out and consider each ranking and evaluate you’ve got left behind to see if any want up to date or deleted.

Though you would possibly nonetheless really feel the identical method a few awful TV present you latterly rewatched, perhaps you’ve got modified your thoughts about an album or e book evaluate you left just a few years in the past. Maybe you simply need to take a look at your entire scores and evaluations that you’ve got forgotten about, to reminisce over years previous.

Viewing Your Rankings & Opinions

Since you may depart scores and evaluations in a wide range of Apple’s inventory apps, there are a number of methods to entry your scores and evaluate historical past. Yow will discover your catalog of rants and raves from the App Retailer, iTunes Retailer, Music, TV, and Books. You may even see all of them within the Settings app. Nonetheless, whilst you can charge and evaluate gadgets in Podcasts, you may’t entry your historical past from it.

App 1: Settings

In iOS 14 or later, faucet in your title on the prime to view your Apple ID, then faucet on “Media and Purchases.” In Account Settings, go into “Rankings and Opinions.”

In iOS 13, faucet in your title on the prime to view your Apple ID, faucet on “iTunes & App Retailer,” then choose your Apple ID. Subsequent, select “View Apple ID” within the pop-up. Lastly, in Account Settings, go into “Rankings and Opinions.” Alternatively, in iOS 13, you may open “iTunes & App Retailer” from Settings, faucet your Apple ID, select “View Apple ID,” then go into “Rankings and Opinions.”

App 2: App Retailer

Faucet in your profile icon within the prime proper, choose “Personalised Suggestions,” and go into “Rankings & Opinions.” You may see different interactions you’ve got had with the App Retailer, similar to purchases, subscriptions, and pre-orders.

App 3: iTunes Retailer

Scroll to the underside of the “Music,” “Motion pictures,” or “TV Reveals” tab, then faucet in your Apple ID. Subsequent, choose “View Apple ID” within the pop-up, then choose “Rankings and Opinions.”

App 4: Music

Faucet in your profile icon within the prime left of the “For You” (iOS 13) or “Hear Now” (iOS 14) tab, then contact “View Apple ID.” Subsequent, faucet “Rankings & Opinions.”

App 5: TV

Faucet in your profile icon within the prime left of the “Watch Now” tab, then faucet your title to see your Apple ID. In Account Settings, go into “Rankings and Opinions.”

App 6: Books

Faucet in your profile icon within the prime left of the “Studying Now” tab, then choose “View Account Settings.” Faucet on “View Account Settings” once more within the pop-up, then choose “Rankings & Opinions.”

Viewing & Deleting Your Rankings & Opinions

Rankings and evaluations are in reverse chronological order, together with your latest additions up prime and oldest on the backside. At present, there isn’t any technique to type the checklist by kind (books, films, and so forth.), and it in all probability will not occur any time quickly. So for the foreseeable future, you are caught with a mishmash of app, sport, music, TV present, film, e book, and podcast scores and evaluations.

Worst of all, there isn’t any fast entry to enhancing a ranking or evaluate in case you need to replace it. To take action, you may have to open its respective app, discover the content material’s web page, then faucet “Write a Evaluation.” Your earlier ranking and evaluate will seem, and you’ll edit it nonetheless you see match.

Apart from simply laughing at any fascinating stuff you wrote years in the past, you may eliminate any that you just’re sad with. To delete a ranking and evaluate, merely swipe left on it, then faucet on the purple “Take away” button that seems. Your ranking and/or evaluate will probably be completely eliminated inside 24 hours.

Maintain Your Connection Safe With no Month-to-month Invoice. Get a lifetime subscription to VPN Limitless for all of your units with a one-time buy from the brand new Gadget Hacks Store, and watch Hulu or Netflix with out regional restrictions.

Purchase Now (80% off) >

Cowl picture and screenshots by Nelson Aguilar/Gadget Hacks

#how_to
https://centramic.com/